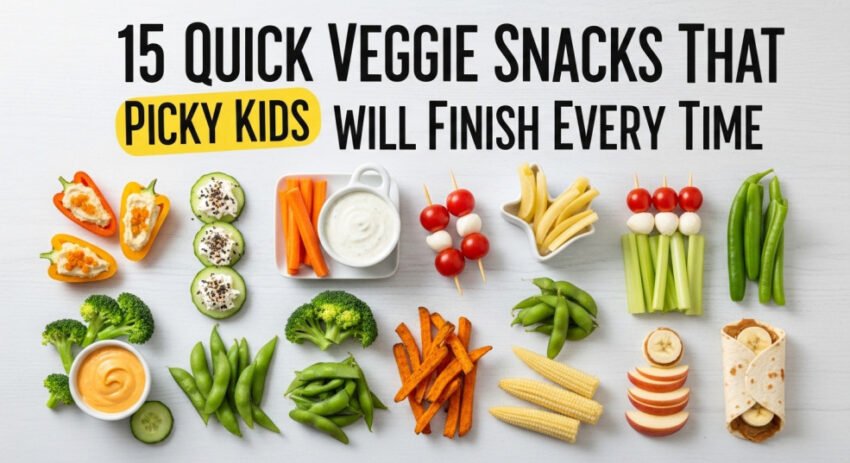
Struggling to get your kids to eat their veggies is a challenge that many parents know all too well. Turning colorful, crunchy vegetables into daily snacks that children genuinely look forward to eating can feel like an uphill battle. Fortunately, bridging the gap between nutritional necessity and kid-approved flavor is entirely possible with the right approach to presentation, texture, and taste.
The key lies in transforming standard vegetables into engaging, flavorful, and visually appealing culinary experiences. From fun dipping options to satisfyingly crispy baked alternatives, these 15 irresistible veggie snacks are designed to stimulate your children’s taste buds while delivering essential nutrients. These recipes are straightforward to prepare and offer an excellent opportunity to involve your children in the kitchen, turning snack preparation into a positive, shared activity. By changing how vegetables are served, you can eliminate snack-time standoffs and introduce nutritional variety into your child’s weekly routine.
The Core Philosophy of Kid-Friendly Veggie Snacks
Before diving into the specific recipes, it is vital to understand why certain vegetable snack presentations succeed where plain, steamed vegetables fail. Children are highly visual and sensitive to food textures. Incorporating a variety of colors, offering interactive elements like dipping sauces, and modifying textures to introduce crunch or crispiness can completely alter a child’s perception of a vegetable.
Furthermore, giving children autonomy over their food—such as letting them select their own toppings or help roll up a wrap—increases their willingness to try new ingredients. The following curated recipes utilize these sensory principles to make wholesome, nutrient-dense ingredients irresistible to growing kids.
1. Rainbow Veggie Wraps
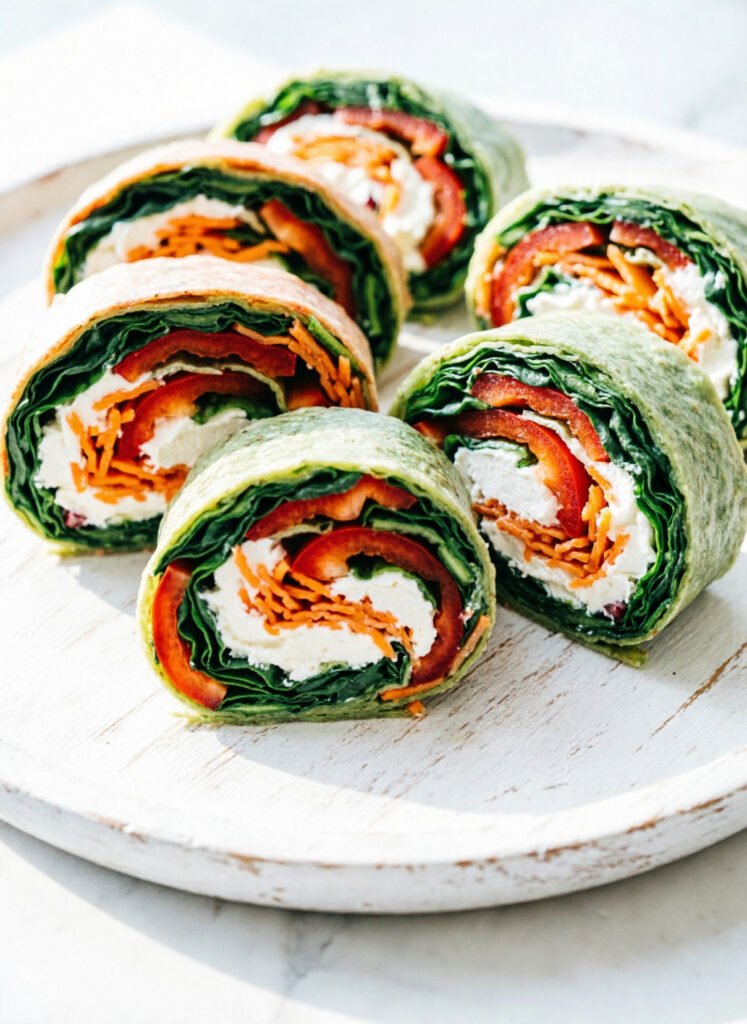
Introduction to Rainbow Wraps
Visual appeal plays a massive role in pediatric nutrition. These vibrant wraps function like a literal rainbow on a plate, instantly capturing a child’s curiosity. Packed with dense layers of fresh spinach, multi-colored bell peppers, and shredded carrots, they provide an exceptional dose of essential vitamins and antioxidants. They are highly versatile, making them ideal for school lunch boxes or an immediate after-school snack. You can customize the base layer using your children’s favorite spreads, such as savory hummus or smooth cream cheese.
Recipe Overview and Nutritional Profile
-
Servings: 4
-
Prep Time: 10 minutes
-
Cook Time: 0 minutes
-
Total Time: 10 minutes
-
Calories: Approximately 150 per wrap
-
Proteins: 6g
-
Carbohydrates: 22g
-
Fats: 7g
-
Fiber: 4g
Ingredients
-
4 large whole wheat tortillas
-
1 cup fresh spinach
-
1 cup mixed-color bell peppers, thinly sliced
-
1 cup shredded carrots
-
1/2 cup hummus or cream cheese
-
Optional additions: sliced avocado, crisp cucumbers, or halved cherry tomatoes
Step-by-Step Instructions
-
Lay the whole wheat tortillas flat on a clean cutting board and spread a generous, even layer of hummus or cream cheese across the surface.
-
Layer the fresh spinach leaves, sliced bell peppers, and shredded carrots evenly over the center of the spread.
-
Add any selected optional vegetables, ensuring they are cut small enough to roll easily.
-
Roll each tortilla tightly from the bottom up to secure the filling, then slice cleanly into bite-sized pinwheels or halves.
-
Serve immediately or wrap securely to pack for later.
Pro Tips for the Best Wraps
-
Utilize a diverse mix of bright bell pepper colors (red, yellow, and orange) to maximize the visual presentation.
-
Set out the prepared ingredients in separate bowls and allow your children to independently build their own wraps.
-
Pair the sliced pinwheels with an extra side of their preferred dipping sauce to make eating interactive.
Frequently Asked Questions
-
Can I make these wraps ahead of time? Yes. Wrap them tightly in plastic wrap or store them in an airtight container to maintain freshness and prevent the tortilla from drying out.
-
What should I do if my child dislikes a specific vegetable in this recipe? These wraps are fully customizable; simply swap out any problematic vegetable for a preferred alternative like thinly sliced turkey or cucumbers.
2. Crunchy Veggie Chips
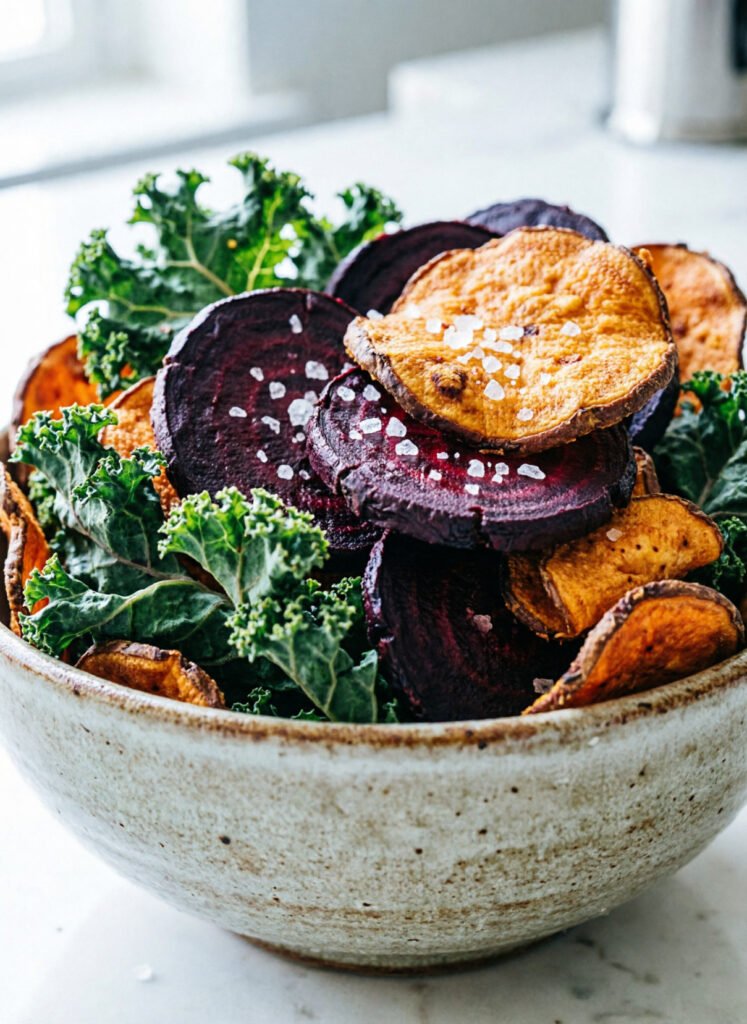
Commercial potato chips are a perpetual favorite among children, but they are often loaded with excess sodium and unhealthy oils. Baked veggie chips offer a fantastic, health-conscious alternative that delivers the exact same satisfying crunch. By baking a thin assortment of curly kale, sweet potatoes, and earthy beets, you can create a colorful snack mix that looks exciting and tastes delicious. They are remarkably simple to prepare and require only a fraction of the oil used in traditional frying methods.
Recipe Overview and Nutritional Profile
-
Servings: 4
-
Prep Time: 15 minutes
-
Cook Time: 20 minutes
-
Total Time: 35 minutes
-
Calories: Approximately 100 per serving
-
Proteins: 3g
-
Carbohydrates: 15g
-
Fats: 2g
-
Fiber: 3g
Ingredients
-
2 cups fresh kale, thoroughly washed with stems removed
-
1 medium sweet potato, washed and thinly sliced
-
1 medium beet, peeled and thinly sliced
-
2 tablespoons olive oil
-
Salt and black pepper to taste
Step-by-Step Instructions
-
Preheat your oven to 350 degrees Fahrenheit (175 degrees Celsius).
-
Toss the prepared kale leaves in a large bowl with a drizzle of olive oil, salt, and pepper until evenly coated.
-
Arrange the kale leaves on a large baking sheet in a single layer, ensuring they do not overlap.
-
Place the thinly sliced sweet potatoes and beets on a separate baking sheet, drizzle evenly with the remaining olive oil, and season lightly.
-
Bake the kale for 10 to 15 minutes until perfectly crisp, and bake the sweet potato and beet slices for roughly 20 minutes until they achieve a crunchy texture.
-
Remove from the oven, allow the chips to cool completely to maximize crispiness, and serve.
Pro Tips for the Best Chips
-
Slice the sweet potatoes and beets as thinly as possible, ideally using a mandoline slicer, to ensure they crisp up evenly without burning.
-
Experiment with kid-friendly seasonings such as smoked paprika, garlic powder, or a sprinkle of nutritional yeast for a cheesy flavor profile.
-
Store any leftover chips in a perfectly airtight container to protect them from ambient moisture and preserve their crunch.
Frequently Asked Questions
-
Can I utilize other root vegetables for this recipe? Yes. Thinly sliced zucchini, parsnips, and carrots respond beautifully to this exact baking method.
3. Veggie Dippers with Creamy Avocado Dip

Children naturally enjoy finger foods that allow them to dip and play with their snacks. This recipe capitalizes on that preference by pairing an assortment of crisp, fresh vegetable sticks with a velvety, smooth avocado dip. This combination delivers a satisfying crunch alongside a rich dose of heart-healthy monounsaturated fats from the avocado, which simultaneously aids in the absorption of the fat-soluble vitamins found in the raw veggies.
Recipe Overview and Nutritional Profile
-
Servings: 4
-
Prep Time: 10 minutes
-
Cook Time: 0 minutes
-
Total Time: 10 minutes
-
Calories: Approximately 80 per serving
-
Proteins: 2g
-
Carbohydrates: 10g
-
Fats: 5g
-
Fiber: 3g
Ingredients
-
1 ripe avocado
-
1 tablespoon fresh lemon juice
-
1 teaspoon garlic powder
-
Salt to taste
-
1 crisp cucumber, sliced into rounds or sticks
-
2 large carrots, cut into uniform sticks
-
1 sweet bell pepper, sliced into long strips
Step-by-Step Instructions
-
Slice the avocado, remove the pit, and scoop the flesh into a medium bowl, mashing it thoroughly with a fork until perfectly smooth.
-
Stir in the fresh lemon juice, garlic powder, and a pinch of salt, mixing until fully incorporated.
-
Wash and slice the cucumber, carrots, and bell pepper into elongated, sturdy shapes that are easy for small hands to grasp.
-
Transfer the avocado dip to a serving bowl and arrange the colorful vegetable sticks neatly around it for dipping.
Pro Tips for the Best Dip
-
Select an avocado that yields slightly to gentle pressure to ensure a perfectly creamy, lump-free texture.
-
If your children are open to fresh herbs, finely chop a small amount of fresh cilantro or dill to mix into the dip for a flavor twist.
-
Serve the dip slightly chilled, as this firms up the texture and enhances the refreshing contrast against the raw vegetables.
Frequently Asked Questions
-
How long can I store the leftover avocado dip? It is best consumed fresh on the first day to prevent oxidation, but it can be stored in the refrigerator for up to two days if you press plastic wrap directly against the surface of the dip.
4. Sweet Potato Hummus
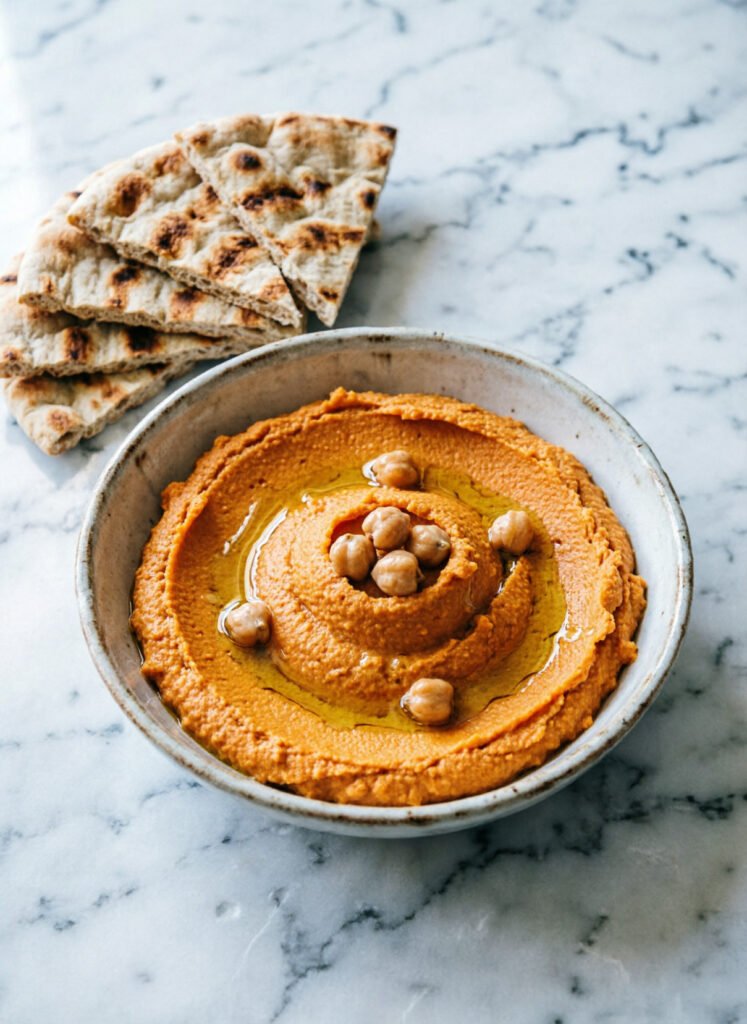
Traditional hummus is a nutritional powerhouse, but its earthy flavor profile can occasionally be met with hesitation from pickier eaters. By integrating cooked sweet potato into the blend, you introduce a natural, mild sweetness that instantly appeals to children’s palates. This vibrant orange dip pairs perfectly with crunchy pita chips, whole-grain crackers, or raw vegetable sticks, transforming a standard snack into a nutrient-dense feast.
Recipe Overview and Nutritional Profile
-
Servings: 6
-
Prep Time: 10 minutes
-
Cook Time: 30 minutes
-
Total Time: 40 minutes
-
Calories: Approximately 120 per serving
-
Proteins: 4g
-
Carbohydrates: 20g
-
Fats: 6g
-
Fiber: 4g
Ingredients
-
1 medium sweet potato
-
1 can (15 ounces) chickpeas, thoroughly drained and rinsed
-
2 tablespoons tahini
-
2 tablespoons extra virgin olive oil
-
1 tablespoon fresh lemon juice
-
Salt and black pepper to taste
Step-by-Step Instructions
-
Peel and carefully cube the sweet potato. Place the cubes in a pot of boiling water and cook until completely tender, which takes roughly 15 minutes. Drain and let cool slightly.
-
In the bowl of a heavy-duty food processor, combine the cooked sweet potato cubes, rinsed chickpeas, tahini, olive oil, lemon juice, salt, and pepper.
-
Process the mixture continuously until it reaches a rich, ultra-smooth consistency. If the paste appears too thick for easy dipping, blend in a tablespoon of water at a time until the desired texture is achieved.
-
Scoop the hummus into a shallow bowl and serve alongside whole-wheat pita triangles or crisp celery sticks.
Pro Tips for the Best Hummus
-
Always use a food processor or a high-speed blender rather than mashing by hand to ensure the silky texture that children prefer.
-
Incorporate a subtle pinch of ground cumin or mild smoked paprika to add structural depth to the flavor without overwhelming young taste buds.
-
While delicious when fresh, storing the hummus in an airtight container in the refrigerator allows the flavors to melb beautifully over time.
Frequently Asked Questions
-
Can this sweet potato hummus be frozen for future use? Yes. It can be frozen securely in a freezer-safe container for up to three months. Thaw it overnight in the refrigerator and stir thoroughly before serving.
5. Cauliflower Cheese Bites

If you are looking for a warm, savory snack that mimics the satisfying comfort of cheesy finger foods, these cauliflower cheese bites are an exceptional choice. They provide a clever method for introducing cruciferous vegetables into a child’s diet by combining steamed cauliflower with a generous amount of gooey, melted cheese. Because they are baked in the oven rather than deep-fried, they remain light, low in saturated fat, and completely wholesome.
Recipe Overview and Nutritional Profile
-
Servings: 4
-
Prep Time: 15 minutes
-
Cook Time: 25 minutes
-
Total Time: 40 minutes
-
Calories: Approximately 170 per serving
-
Proteins: 5g
-
Carbohydrates: 12g
-
Fats: 10g
-
Fiber: 3g
Ingredients
-
2 cups fresh cauliflower florets
-
1 cup shredded cheese, such as sharp cheddar or mozzarella
-
1 large egg, lightly beaten
-
1/2 cup fine breadcrumbs
-
Salt and black pepper to taste
Step-by-Step Instructions
-
Preheat your oven to 400 degrees Fahrenheit (200 degrees Celsius).
-
Steam the fresh cauliflower florets over boiling water until they are completely tender, which should take approximately 10 minutes.
-
Transfer the steamed cauliflower to a large mixing bowl and mash it thoroughly with a potato masher until it is broken down into small, uniform pieces.
-
Add the shredded cheese, beaten egg, breadcrumbs, salt, and pepper directly to the mashed cauliflower, stirring until a cohesive dough forms.
-
Scoop out small portions of the mixture and shape them into bite-sized balls or small tater-tot shapes using your hands.
-
Arrange the formed bites onto a parchment-lined baking sheet and bake for 20 minutes, or until the exterior turns an attractive golden brown. Serve warm.
Pro Tips for the Best Bites
-
Feel free to adjust the ratio or types of cheese utilized; mixing parmigiano-reggiano with cheddar can add a delicious depth of flavor.
-
Incorporate finely chopped fresh herbs like Italian parsley or a pinch of dried oregano into the breadcrumb mixture for a subtle seasoning boost.
-
Serve these crispy bites alongside a shallow dish of warm marinara sauce to turn the snack into a fun, pizza-themed dipping experience.
Frequently Asked Questions
-
Can I use frozen cauliflower instead of fresh florets? Yes, frozen cauliflower works perfectly. Simply thaw it completely and press out any excess water with a clean kitchen towel before mashing to ensure the bites do not become soggy.
6. Veggie Sushi Rolls
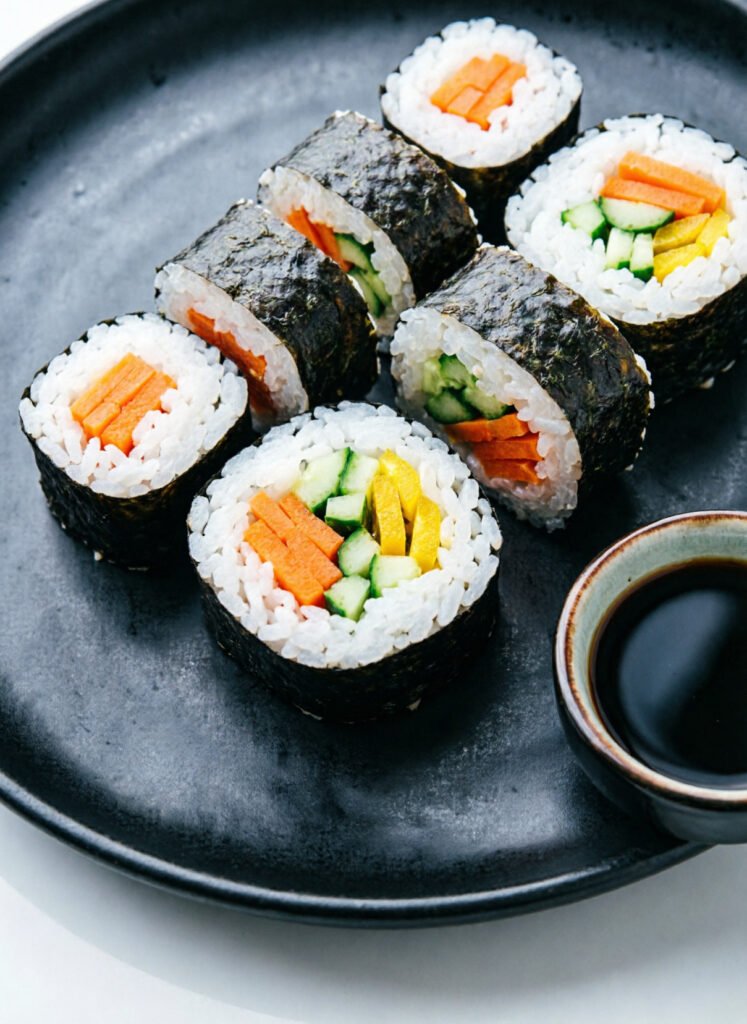
Introducing children to diverse cultural formats of eating can make snack time feel like an adventure. These vegetarian sushi rolls offer an interactive and highly engaging platform for showcasing crisp vegetables. By utilizing traditional sushi rice, sheets of nori, and an assortment of finely julienned vegetables, you create a texturally exciting snack that kids can help assemble. This hands-on involvement demystifies the ingredients and significantly increases their enthusiasm for eating them.
Recipe Overview and Nutritional Profile
-
Servings: 4
-
Prep Time: 20 minutes
-
Cook Time: 15 minutes
-
Total Time: 35 minutes
-
Calories: Approximately 130 per roll
-
Proteins: 4g
-
Carbohydrates: 25g
-
Fats: 2g
-
Fiber: 4g
Ingredients
-
1 cup uncooked sushi rice
-
4 sheets of high-quality nori
-
1 cucumber, finely julienned
-
1 large carrot, finely julienned
-
1 sweet bell pepper, cut into thin strips
-
Low-sodium soy sauce for dipping
Step-by-Step Instructions
-
Cook the sushi rice according to the specific package instructions and allow it to cool to room temperature.
-
Place a single sheet of nori flat on a bamboo sushi rolling mat.
-
Dampen your fingers slightly with water and press a thin, even layer of the cooled sushi rice across the nori, making sure to leave a clean 1-inch border at the top edge.
-
Arrange the julienned cucumbers, carrots, and bell peppers in a neat, straight line along the bottom edge of the rice layer.
-
Grasp the edge of the bamboo mat closest to you and roll the nori tightly upward, applying gentle, even pressure to form a solid log.
-
Use a very sharp knife to slice the log cleanly into bite-sized rounds. Serve alongside a small dish of low-sodium soy sauce.
Pro Tips for the Best Rolls
-
Keep a shallow bowl of clean water nearby to dip your fingers into frequently, as this prevents the sticky sushi rice from adhering to your skin.
-
Expand the filling options by introducing rich textures like creamy avocado slices or a thin spread of cream cheese alongside the vegetables.
-
Encourage your kids to experiment with different sizes and shapes, keeping the process creative and lighthearted.
Frequently Asked Questions
-
Can I substitute white sushi rice with brown rice? Yes, brown rice can be utilized to boost fiber content, though it may alter the classic sticky texture slightly and require a bit more pressure when rolling.
7. Zucchini Fritters
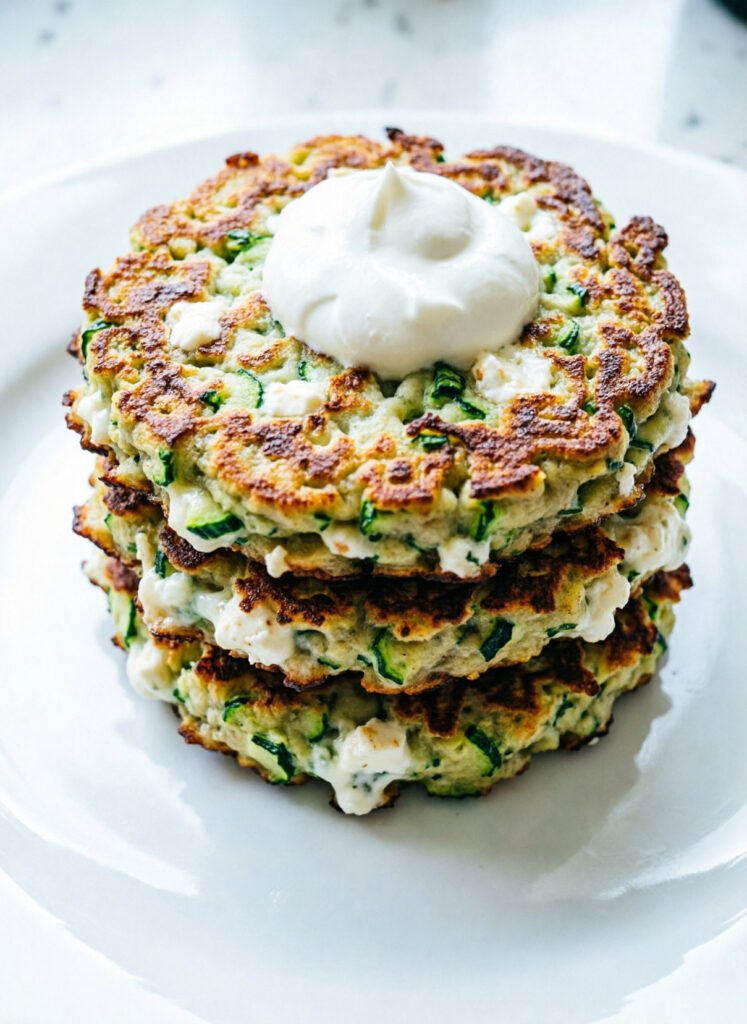
Zucchini can occasionally be a tough sell for children due to its high water content when cooked simply. However, when grated, mixed with a hint of flavorful cheese, and pan-seared into a crispy round, it becomes an instant household hit. These savory fritters successfully mask the soft texture of zucchini, delivering a golden, crispy exterior that encloses a tender, nutritious interior. They are incredibly easy to batch-cook and serve throughout the week.
Recipe Overview and Nutritional Profile
-
Servings: 4
-
Prep Time: 10 minutes
-
Cook Time: 15 minutes
-
Total Time: 25 minutes
-
Calories: Approximately 130 per fritter
-
Proteins: 5g
-
Carbohydrates: 15g
-
Fats: 5g
-
Fiber: 2g
Ingredients
-
2 medium zucchinis, thoroughly grated
-
1 cup fine breadcrumbs
-
1 large egg
-
1/2 cup feta cheese, finely crumbled
-
Salt and black pepper to taste
-
A small amount of olive oil for cooking
Step-by-Step Instructions
-
Place the grated zucchini into a clean kitchen towel and squeeze it forcefully over the sink to remove as much excess moisture as possible.
-
In a large mixing bowl, combine the thoroughly drained zucchini, breadcrumbs, egg, crumbled feta cheese, salt, and pepper, stirring until uniform.
-
Heat a small splash of olive oil in a non-stick skillet over medium heat.
-
Scoop a generous spoonful of the zucchini mixture into the hot skillet, gently flattening it with the back of the spoon to form a round fritter.
-
Cook the fritters undisturbed for 3 to 4 minutes per side, turning carefully once they achieve a rich, golden-brown crust.
-
Transfer the cooked fritters to a plate lined with paper towels to drain any surface oil, and serve warm.
Pro Tips for the Best Fritters
-
Do not skip or rush the moisture-squeezing step; removing the water from the zucchini is the primary secret to preventing a soggy fritter.
-
Boost the flavor profile by adding a pinch of garlic powder, onion powder, or finely minced fresh dill to the batter.
-
Store any leftover cooked fritters in an airtight container in the refrigerator; they can be quickly reheated in a toaster oven to restore their original crispiness.
Frequently Asked Questions
-
Can these zucchini fritters be baked in the oven instead of pan-fried? Absolutely. Arrange the flattened fritters on a lined baking sheet and bake at 375 degrees Fahrenheit (190 degrees Celsius) for roughly 20 minutes, flipping halfway through.
8. Beet and Goat Cheese Salad
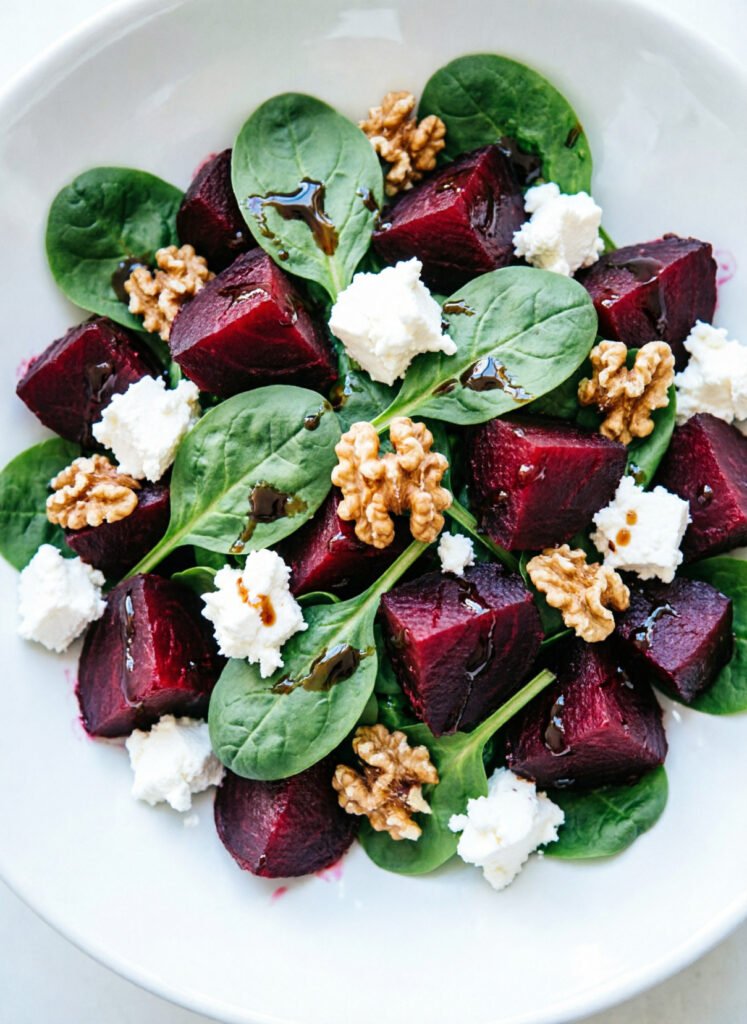
While a structured salad might seem overly sophisticated for younger children, the distinct components of this dish offer an excellent balance of sweetness and creaminess that kids enjoy. Roasting the beets caramelizes their natural sugars, drawing out an intense sweetness that contrasts beautifully with the tangy, velvety texture of crumbled goat cheese. It works beautifully as an elegant side dish or a refreshing light lunch.
Recipe Overview and Nutritional Profile
-
Servings: 4
-
Prep Time: 15 minutes
-
Cook Time: 30 minutes
-
Total Time: 45 minutes
-
Calories: Approximately 150 per serving
-
Proteins: 5g
-
Carbohydrates: 20g
-
Fats: 7g
-
Fiber: 5g
Ingredients
-
2 medium fresh beets, thoroughly washed
-
4 cups tender mixed salad greens
-
1/2 cup high-quality goat cheese, crumbled
-
1/4 cup walnuts, lightly toasted
-
2 tablespoons mild balsamic vinaigrette
Step-by-Step Instructions
-
Preheat your oven to 400 degrees Fahrenheit (200 degrees Celsius).
-
Wrap the whole fresh beets securely in aluminum foil and roast them in the oven for approximately 30 minutes, or until a fork easily pierces the center.
-
Allow the beets to cool completely, then gently peel off the skins and slice them into uniform, bite-sized rounds or cubes.
-
In a large salad bowl, combine the mixed salad greens, roasted beet slices, crumbled goat cheese, and toasted walnuts.
-
Drizzle the balsamic vinaigrette evenly over the top, toss the salad gently to prevent the beets from bleeding excessively, and serve.
Pro Tips for the Best Salad
-
Always customize the salad base with ultra-tender greens like baby spinach or butter lettuce, as children generally prefer milder flavors over bitter greens.
-
Utilize toasted nuts or seeds to introduce a distinct, crunchy element that contrasts elegantly with the creamy cheese.
-
For an extra nutritional and texture boost, sprinkle a handful of sunflower seeds or pumpkin seeds across the top before serving.
Frequently Asked Questions
-
Can I use canned beets to save time? Yes, canned beets are a convenient alternative, though roasting fresh beets yields a vastly superior, sweet flavor and a firmer, less mushy texture.
9. Carrot and Celery Ants on a Log
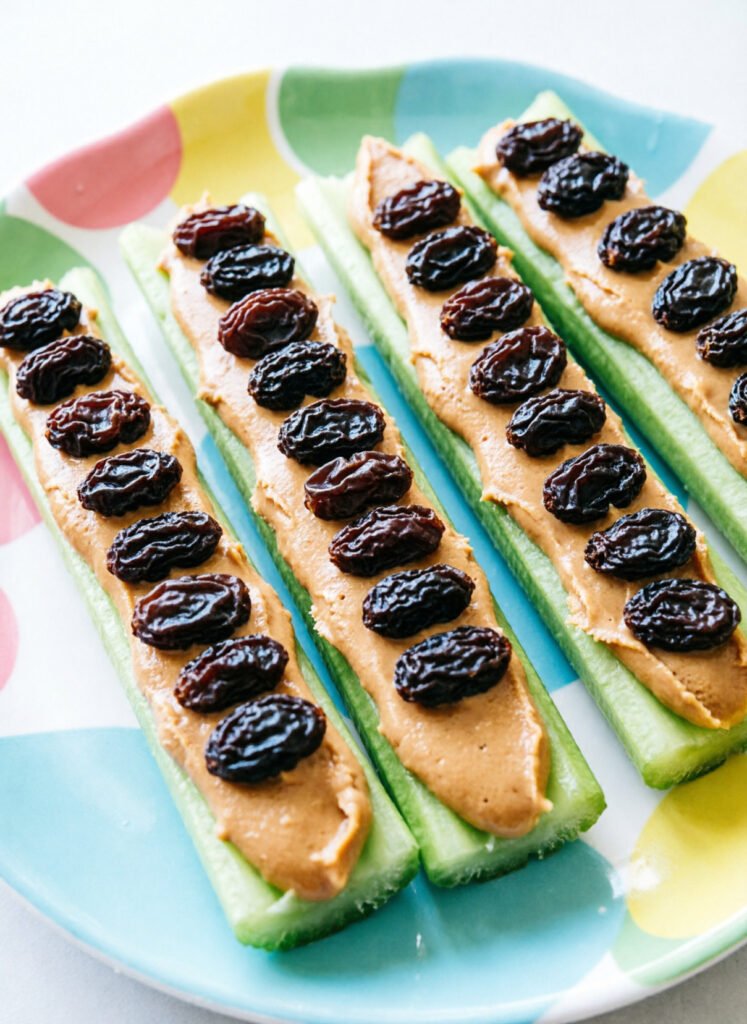
Food whimsicality is a powerful asset when encouraging children to eat fresh vegetables. This classic, retro snack combines crisp, structured celery sticks with a rich layer of creamy nut butter and sweet raisins to represent little ants marching across a log. The interactive, playful nature of this assembly completely distracts from the fact that they are consuming raw vegetables, making it a reliable favorite for busy afternoons.
Recipe Overview and Nutritional Profile
-
Servings: 4
-
Prep Time: 5 minutes
-
Cook Time: 0 minutes
-
Total Time: 5 minutes
-
Calories: Approximately 100 per serving
-
Proteins: 4g
-
Carbohydrates: 12g
-
Fats: 5g
-
Fiber: 3g
Ingredients
-
4 crisp celery sticks, washed and trimmed
-
4 tablespoons creamy peanut butter or smooth cream cheese
-
24 sweet raisins
Step-by-Step Instructions
-
Cut the prepared celery sticks into manageable, child-friendly lengths, roughly 3 to 4 inches each.
-
Using a butter knife, carefully spread an even layer of peanut butter or cream cheese directly into the natural groove of each celery stick.
-
Press 3 to 6 raisins gently into the spread on each stick, spacing them out to look like “ants” walking in a line.
-
Arrange the completed logs on a plate and serve immediately.
Pro Tips for the Best Ants on a Log
-
If your child’s school has a strict nut policy, easily substitute the peanut butter with smooth sunflower seed butter or almond butter.
-
Vary the “ants” by using dried cranberries, dark chocolate chips, or wild blueberries to keep the snack interesting.
-
Turn snack assembly into a game by providing the components separately and letting your children design their own unique logs.
Frequently Asked Questions
-
Can I assemble these logs a day in advance? This snack is best served immediately upon preparation, as pre-filled celery stored in the refrigerator can lose its crispness and become slightly soggy over time.
10. Broccoli and Cheese Stuffed Potatoes

Twice-baked stuffed potatoes seamlessly merge the comforting, familiar texture of fluffy baked potatoes with the dense nutrition of finely chopped broccoli. Melting a layer of savory cheese throughout the potato mixture masks any intense bitterness from the green vegetable, making it incredibly approachable for children. This dish is robust enough to serve as a substantial after-school snack or a casual, light weeknight dinner.
Recipe Overview and Nutritional Profile
-
Servings: 4
-
Prep Time: 10 minutes
-
Cook Time: 30 minutes
-
Total Time: 40 minutes
-
Calories: Approximately 200 per serving
-
Proteins: 7g
-
Carbohydrates: 30g
-
Fats: 8g
-
Fiber: 4g
Ingredients
-
4 medium baking potatoes, washed thoroughly
-
1 cup steamed broccoli, very finely chopped
-
1 cup shredded cheese, such as sharp cheddar
-
Salt and black pepper to taste
Step-by-Step Instructions
-
Preheat your oven to 425 degrees Fahrenheit (220 degrees Celsius).
-
Pierce the potatoes with a fork and bake them for approximately 30 minutes, or until the interior is completely soft and cooked through.
-
Allow the potatoes to cool slightly, then slice each one in half lengthwise and carefully scoop out the fluffy inner flesh, leaving a sturdy border of skin.
-
In a medium bowl, mash the scooped potato flesh together with the finely chopped steamed broccoli, shredded cheddar cheese, salt, and pepper.
-
Spoon the savory broccoli-potato mixture evenly back into the hollowed potato skins.
-
Place the stuffed skins back onto a baking sheet and bake for an additional 10 minutes until the cheese is completely melted and bubbling. Serve warm.
Pro Tips for the Best Stuffed Potatoes
-
Elevate the filling by incorporating a dollop of Greek yogurt or sour cream for extra creaminess, or top with crispy panko breadcrumbs for texture.
-
Set up a miniature potato bar on your kitchen counter, allowing your children to select their own seasonings and extra toppings.
-
Keep any leftovers stored in the refrigerator; they can be quickly reheated in the microwave or oven for an instant snack throughout the week.
Frequently Asked Questions
-
Is it acceptable to utilize frozen broccoli for this dish? Yes. Ensure the frozen broccoli is fully thawed, steamed, and thoroughly drained of excess water before chopping to prevent the potato filling from becoming runny.
11. Mini Veggie Pizzas
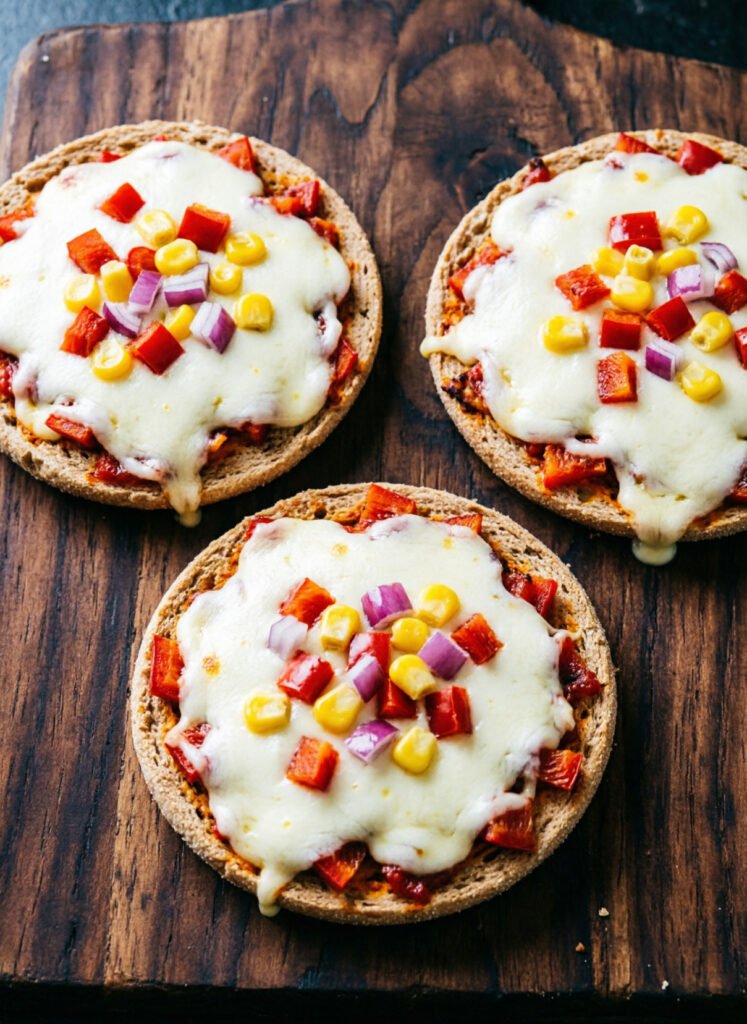
Pizza is a near-universal favorite among children, making it an excellent vehicle for introducing a colorful assortment of vegetables into their diet. By utilizing whole-wheat pita pockets or split English muffins as an instant crust, you cut down on preparation time while offering a wholesome base. Children thrive when granted culinary autonomy, and these miniature pizzas allow them to fully customize their toppings, turning a standard meal into a fun, creative process.
Recipe Overview and Nutritional Profile
-
Servings: 4
-
Prep Time: 10 minutes
-
Cook Time: 10 minutes
-
Total Time: 20 minutes
-
Calories: Approximately 180 per pizza
-
Proteins: 6g
-
Carbohydrates: 22g
-
Fats: 8g
-
Fiber: 3g
Ingredients
-
4 whole wheat pitas or English muffins
-
1 cup high-quality pizza sauce
-
1 cup shredded mozzarella cheese
-
1 cup assorted finely chopped vegetables, such as bell peppers, mild mushrooms, and sweet onions
Step-by-Step Instructions
-
Preheat your oven to 400 degrees Fahrenheit (200 degrees Celsius).
-
Arrange the whole-wheat pitas or split English muffins flat on a large baking sheet.
-
Spoon a generous layer of pizza sauce evenly over the surface of each base.
-
Sprinkle the shredded mozzarella cheese uniformly over the sauce.
-
Allow your children to decorate the tops of their pizzas with their chosen assortment of chopped vegetables.
-
Bake in the oven for approximately 10 minutes, or until the cheese is entirely melted, golden, and bubbly. Let cool slightly before slicing and serving.
Pro Tips for the Best Mini Pizzas
-
Turn the assembly line into a creative game where kids can design faces, geometric patterns, or landscapes using distinct vegetable shapes.
-
This recipe provides a fantastic opportunity to use up leftover cooked vegetables from previous dinners, minimizing kitchen waste.
-
Pair the mini pizzas with a simple side salad or sliced raw cucumbers to create a beautifully balanced, nutrient-dense lunch.
Frequently Asked Questions
-
Can these miniature pizzas be frozen ahead of time? Yes. Assemble the pizzas completely with sauce, cheese, and toppings, then freeze them flat on a tray before baking. Once frozen solid, transfer them to a freezer bag and bake directly from frozen, adding an extra 3 to 5 minutes to the total cooking time.
12. Fruit and Veggie Smoothie Pops
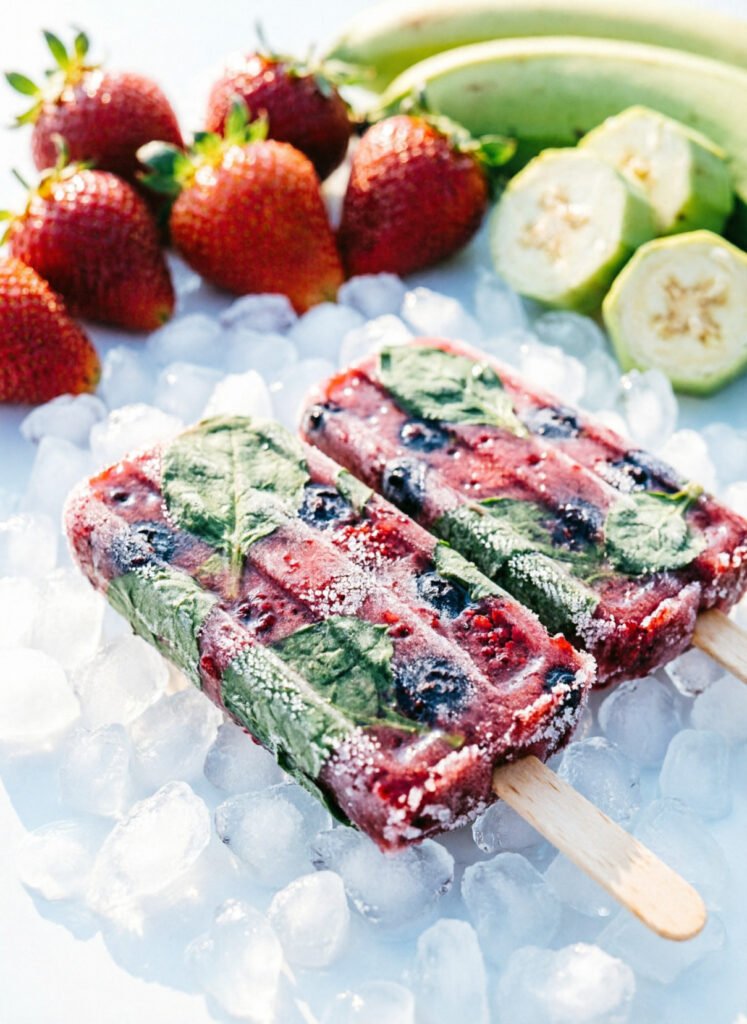
During warmer months, children constantly crave refreshing frozen treats. These homemade smoothie popsicles offer a brilliant way to sneak nutrient-dense leafy greens into a snack that tastes entirely like sweet, delicious fruit. The freezing process naturally dulls any faint bitterness from vegetables like spinach, while the naturally fun shape of a popsicle makes the snack irresistible to young children.
Recipe Overview and Nutritional Profile
-
Servings: 6
-
Prep Time: 10 minutes
-
Cook Time: 0 minutes
-
Total Time: 10 minutes plus freezing time
-
Calories: Approximately 60 per popsicle
-
Proteins: 1g
-
Carbohydrates: 14g
-
Fats: 0g
-
Fiber: 2g
Ingredients
-
1 cup fresh spinach leaves
-
1 ripe banana
-
1 cup mixed berries, fresh or frozen
-
1 cup plain or vanilla Greek yogurt
-
1 cup 100% fruit juice or milk of choice
Step-by-Step Instructions
-
In a high-speed blender, combine the fresh spinach, ripe banana, mixed berries, Greek yogurt, and liquid base.
-
Blend on high for 1 to 2 minutes until the mixture is completely smooth, liquefied, and free of any visible leaf fragments.
-
Carefully pour the vibrant liquid evenly into your favorite popsicle molds.
-
Insert the popsicle sticks firmly into the molds and place them flat in the freezer for at least 4 hours, or until completely solid.
-
Once frozen, briefly run the exterior of the molds under warm tap water to easily release the popsicles. Serve immediately.
Pro Tips for the Best Pops
-
Always pair leafy greens with highly flavorful, sweet fruits like ripe bananas, sweet mangoes, or pineapples to fully mask any vegetable flavor.
-
Mix and match different berry combinations to create fun variations in color and taste.
-
If the fruit blend requires an extra touch of sweetness to appeal to your child, stir in a single teaspoon of raw honey or pure maple syrup before freezing.
Frequently Asked Questions
-
Can I utilize other green vegetables besides spinach? Yes, mild greens like curly kale or Swiss chard work beautifully, provided you blend them thoroughly to ensure a smooth texture.
13. Sweet Pea and Mint Dip

This exceptionally bright, refreshing green dip departs from conventional snack profiles by combining sweet green peas with a hint of cooling fresh mint. Peas naturally possess a sweet flavor profile that children enjoy, and blending them with smooth Greek yogurt creates a vibrant dip that pairs perfectly with whole-grain crackers or raw carrot sticks. The striking, bright green color looks fun on a platter, offering an easy way to expand your child’s palate.
Recipe Overview and Nutritional Profile
-
Servings: 4
-
Prep Time: 5 minutes
-
Cook Time: 0 minutes
-
Total Time: 5 minutes
-
Calories: Approximately 70 per serving
-
Proteins: 3g
-
Carbohydrates: 12g
-
Fats: 2g
-
Fiber: 4g
Ingredients
-
1 cup frozen green peas, fully thawed
-
1/4 cup plain Greek yogurt
-
1 tablespoon fresh mint leaves, finely chopped
-
Salt and black pepper to taste
Step-by-Step Instructions
-
Place the fully thawed green peas, Greek yogurt, finely chopped mint, salt, and pepper directly into the bowl of a food processor.
-
Process the ingredients continuously until the mixture transforms into a vibrant, uniform, and smooth purée.
-
Transfer the green dip into a shallow bowl and serve immediately alongside whole-grain crackers, pita chips, or raw vegetable sticks.
Pro Tips for the Best Dip
-
When spring brings fresh peas into season, substitute them for the frozen ones to enjoy a sweeter, more intense flavor profile.
-
Carefully monitor the amount of fresh mint used; start with a small amount and adjust according to your child’s preference, as too much mint can feel overwhelming.
-
Keep the dip stored in an airtight container in the refrigerator; it maintains its optimal flavor and color for up to three days.
Frequently Asked Questions
-
Can I substitute the Greek yogurt with a dairy-free option? Yes, you can seamlessly swap the yogurt for sour cream or a favorite plant-based yogurt alternative like unsweetened coconut or almond milk yogurt.
14. Vegetable Pancakes
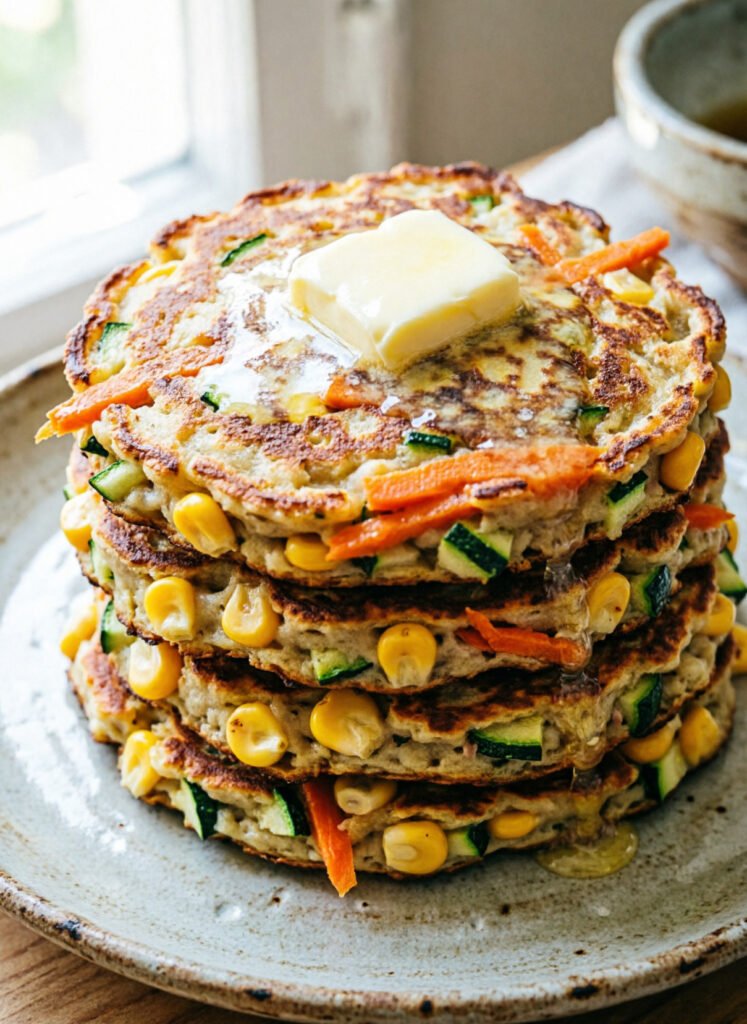
Savory pancakes are a hearty, incredibly satisfying snack option that easily wins over even the pickiest children. Packed with a finely grated mixture of zucchini, sweet carrots, and crisp corn kernels, these pancakes offer a wonderful blend of textures and comforting flavors. They work beautifully as a quick morning breakfast, a substantial afternoon snack, or a portable option for park outings, and can be served alongside a dollop of cool yogurt or sweet applesauce.
Recipe Overview and Nutritional Profile
-
Servings: 4
-
Prep Time: 10 minutes
-
Cook Time: 15 minutes
-
Total Time: 25 minutes
-
Calories: Approximately 150 per pancake
-
Proteins: 4g
-
Carbohydrates: 20g
-
Fats: 7g
-
Fiber: 3g
Ingredients
-
1 cup zucchini, finely grated
-
1 cup carrots, finely grated
-
1 cup sweet corn kernels, fresh or canned
-
2 large eggs
-
1 cup all-purpose or whole wheat flour
-
Salt and black pepper to taste
-
A small touch of butter or oil for the pan
Step-by-Step Instructions
-
In a large mixing bowl, thoroughly combine the grated zucchini, grated carrots, corn kernels, eggs, flour, salt, and pepper, stirring until a thick batter forms.
-
Heat a large non-stick skillet or griddle over medium heat and melt a small pat of butter or oil across the surface.
-
Pour a ladle of the vegetable batter onto the hot skillet, gently shaping it into a round pancake.
-
Cook undisturbed for 3 to 4 minutes per side, carefully flipping the pancake once the edges firm up and the bottom turns a beautiful golden brown.
-
Serve warm with a side of plain Greek yogurt or natural applesauce for dipping.
Pro Tips for the Best Pancakes
-
Feel free to substitute or add other vegetables you have on hand, such as finely minced broccoli or grated sweet potatoes.
-
Form mini, silver-dollar-sized versions of these pancakes to create a finger-food presentation that kids love to eat.
-
Cook a large batch over the weekend and freeze the extras between layers of parchment paper for instant, toaster-ready snacks on busy weekdays.
Frequently Asked Questions
-
Is it safe to utilize frozen corn and zucchini for this recipe? Yes. Ensure the frozen vegetables are completely thawed and thoroughly drained of excess water before adding them to the batter to avoid a runny consistency.
15. Cucumber Sandwiches
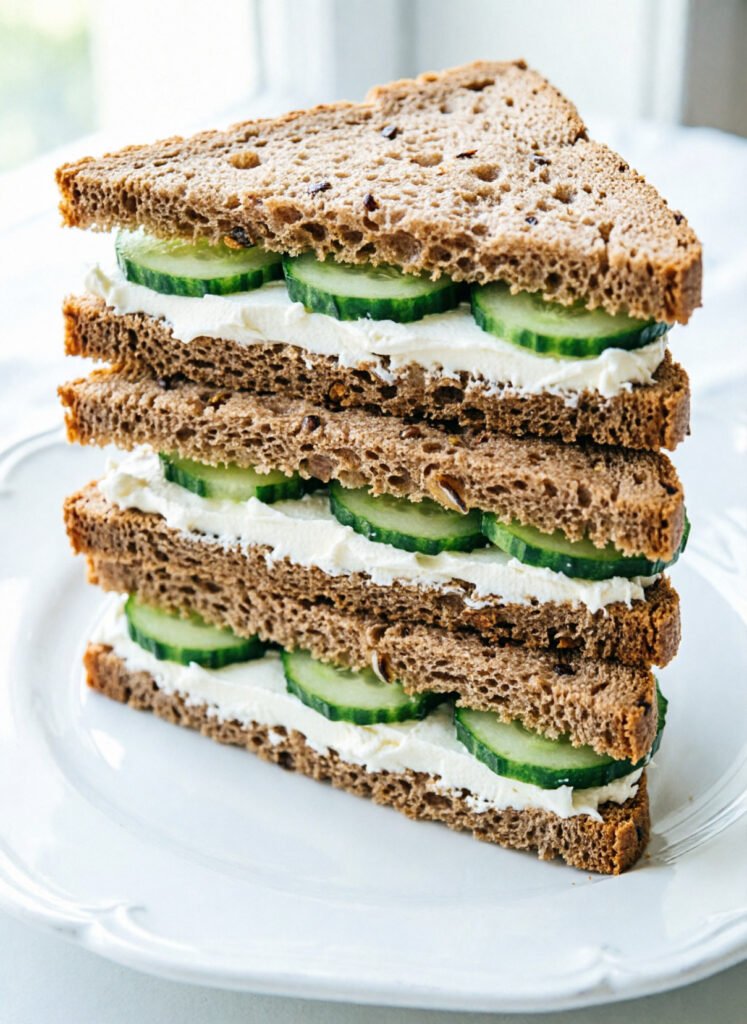
Introducing fresh vegetables within familiar, approachable formats is a reliable strategy for children. These delicate cucumber sandwiches combine a smooth layer of rich cream cheese with paper-thin slices of crisp cucumber, creating a texturally pleasing snack that feels like a special treat. They are an exceptional choice for hosting indoor afternoon tea parties, packing into school lunch boxes, or serving as a cool, refreshing summer snack.
Recipe Overview and Nutritional Profile
-
Servings: 4
-
Prep Time: 10 minutes
-
Cook Time: 0 minutes
-
Total Time: 10 minutes
-
Calories: Approximately 50 per sandwich
-
Proteins: 2g
-
Carbohydrates: 8g
-
Fats: 2g
-
Fiber: 1g
Ingredients
-
8 slices of soft whole wheat bread
-
1 small English cucumber, sliced paper-thin
-
4 tablespoons cream cheese, softened
-
Fresh dill or parsley for a subtle garnish
Step-by-Step Instructions
-
Lay the bread slices flat and spread an even layer of softened cream cheese across one side of each slice.
-
Arrange the thinly sliced cucumber rounds in a neat, overlapping pattern across half of the prepared bread slices.
-
Top with the remaining bread slices, cream cheese side down, to close the sandwiches, then cut them cleanly into fun triangles or small quarters.
-
Garnish lightly with fresh herbs if desired, and serve immediately.
Pro Tips for the Best Sandwiches
-
Use fun metal cookie cutters to slice the sandwiches into exciting shapes like stars, hearts, or animals, which instantly boosts kid appeal.
-
Experiment with store-bought flavored cream cheeses, such as chive or vegetable flavor, to add an easy burst of extra taste.
-
You can easily prepare these a few hours ahead of time; keep them wrapped in a damp paper towel inside a sealed container in the refrigerator to ensure they stay soft and fresh.
Frequently Asked Questions
-
Can I use other spreads if my child dislikes cream cheese? Yes. Savory hummus, smooth avocado spread, or a layer of plain Greek yogurt mixed with a pinch of salt are all fantastic, health-conscious alternatives.
Conclusion: Transforming Snack Time into an Adventure
Ensuring your children get their daily serving of vegetables does not have to be a daily source of stress. By stepping away from plain presentations and embracing these 15 irresistible veggie snacks, you can transform ordinary snack times into flavorful culinary adventures that your kids will genuinely look forward to eating. Each recipe has been carefully crafted to engage young taste buds, utilize texturally pleasing elements, and encourage long-term healthy eating habits.
Whether you are rolling up colorful sushi, baking crispy chips, or assembling mini pizzas, involving your children in the preparation process transforms eating into a fun, rewarding experience. Start integrating these nutrient-dense options into your weekly family routine and watch your kids enthusiastically discover a whole new world of delicious vegetables.
FAQs
What are some easy veggie snack ideas for picky eaters?
If you are dealing with an exceptionally picky eater, start with visually engaging and highly familiar snacks. Recipes like mini veggie pizzas or rainbow veggie wraps are fantastic starting points because they are colorful and allow children to fully customize their toppings, increasing the likelihood that they will enjoy them. Classic options like ants on a log are also excellent because they pair a crisp vegetable with familiar, well-loved flavors like peanut butter.
How can I make veggie snacks more appealing to my kids?
Presentation and tactile engagement are key to success. Focus on cutting vegetables into fun, unique shapes using mandolines or cookie cutters, and pair them with vibrant, flavorful dips like sweet potato hummus or creamy avocado dip. Furthermore, actively involve your children in the kitchen by letting them assemble their own snacks, such as veggie sushi rolls. This sense of ownership makes them far more receptive to trying new ingredients.
Are veggie snacks genuinely healthy for growing children?
Yes, they are incredibly beneficial. Vegetables are packed with essential vitamins, minerals, fiber, and vital antioxidants that directly support your child’s physical growth, immune function, and cognitive development. Wholesome snacks like broccoli and cheese stuffed potatoes or baked cauliflower cheese bites offer a wonderful balance of comforting flavor while delivering crucial daily nutrition.
Can I prepare these veggie snacks in advance for busy weekdays?
Absolutely. Many of these snack options lend themselves beautifully to forward planning and batch cooking. Snacks like crunchy veggie chips or fruit and veggie smoothie pops can be prepared over the weekend and stored securely for quick access later in the week. To maintain optimal freshness, texture, and flavor, always store prepared snacks in airtight containers in the refrigerator or freezer.
How can I encourage my kids to try a completely new veggie snack?
The best approach is to treat introducing new foods as a relaxed family adventure. Introduce only one new snack at a time—such as zucchini fritters or vegetable pancakes—and avoid putting immense pressure on the child to finish the portion. Make it a fun, shared activity by tasting the food together and discussing the textures and flavors openly. Creating a designated “new veggie snack night” can turn trying new foods into an exciting household tradition.